So, one of the most important parts of our mobile applications is managing the data. We usually save everything to our back-end. However, what happens when we need to have it available on our devices? Read my review to learn more about the Realm database for Android
Performance, security, and offline capability are all reasons we might need to have local databases. Today I would like to introduce to you my favorite option to accomplish that. In my opinion, it is the fastest, easiest way: Realm Database.
Realm is (in my personal opinion, of course) the best database you can use; since it is easy to set up, straightforward to work with and you can use it in several platforms.
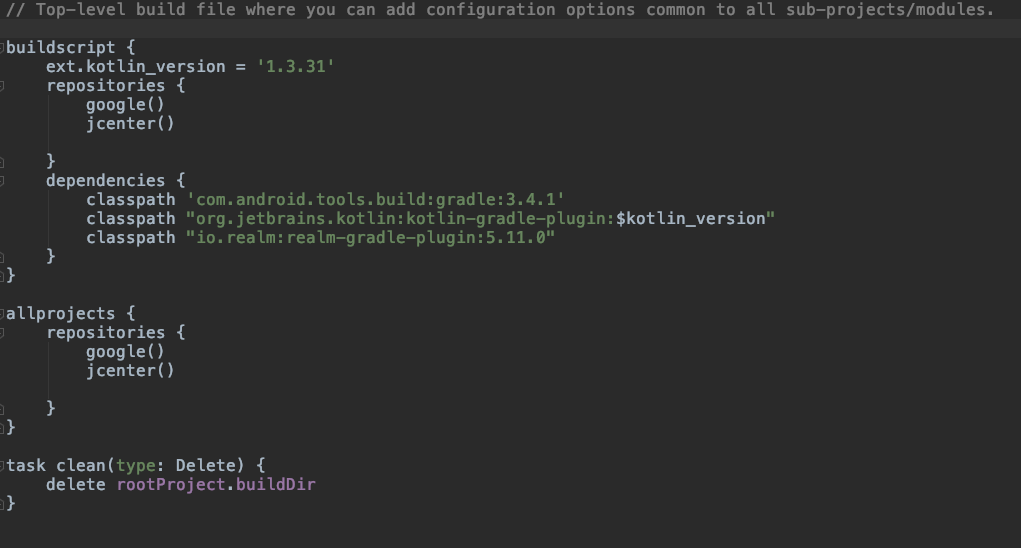
In this particular example, I’ll show you how to set up Realm for a Kotlin project. Let’s get to it, shall we? First of all, we need to modify our Gradle files. In our project level build.gradle file we are going to add this dependency:
classpath "io.realm:realm-gradle-plugin:5.11.0"
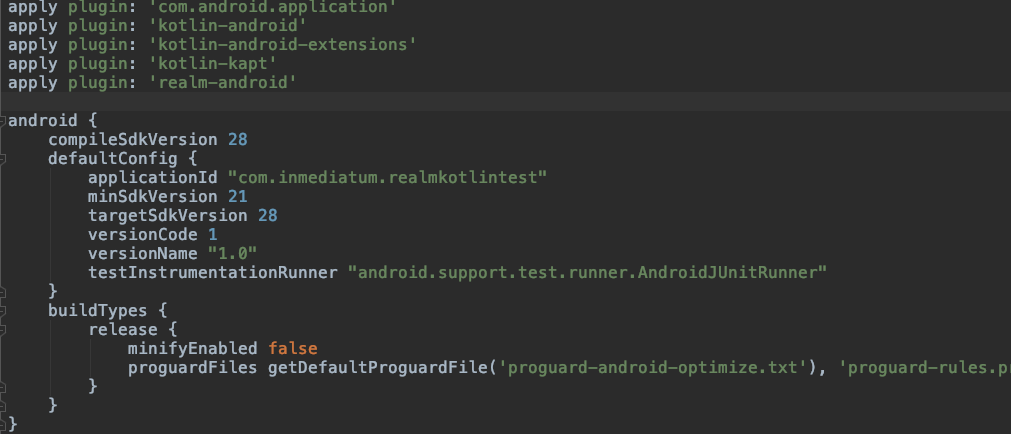
In our application level build.gradle file we are going to add these two lines. This is a nice trick for realm to work in Kotlin.
apply plugin: 'kotlin-kapt'
apply plugin: 'realm-android'
So this is how our files should look like after the modifications.
Project level build.gradle:

Application level build.gradle:

After these two modifications, we just sync our project and we are ready to go!
Before you start using Realm, you need to initiate it. I usually do this on my Application extended class, but for purposes of this example, I’ll do it on the onCreate method of my MainActivity. There are many configurations you can do according to your needs, here is the link to the realm documentation about it if you want to learn more about it.
override fun onCreate(savedInstanceState: Bundle?) {
        super.onCreate(savedInstanceState)
        setContentView(R.layout.activity_main)

        //Init realm code
        Realm.init(this)
        val config = RealmConfiguration.Builder()
            .name("testdb.realm")
            .schemaVersion(1)
            .deleteRealmIfMigrationNeeded()
            .build()
        Realm.setDefaultConfiguration(config)
    }
The next step is to create our models. In this case, we will generate two of them, one is the User model and the other one is the Note model, the user will have one-to-many relation to the notes.
User model:
open class User(

    @PrimaryKey var id: Long = 0,

    var name: String = "",

    var age: Int = 0,

    var notes : RealmList<Note> = RealmList()


) : RealmObject()
Note model:
open class Note(

    var id: Int = 0,

    var text: String = ""


) : RealmObject()
Now that we have our models created, we only need to start creating data for our database.
The first step for every action is to get our realm instance:
val realm : Realm = Realm.getDefaultInstance()
Now that we have our realm instance, there are several ways we can do that, but the basic way to that is :
realm.createObject<Model>(<primaryKeyIfNeeded>)
So, here is a function that uses a for loop to create user and notes:
fun createDummyData() {

        realm = Realm.getDefaultInstance()


        //The writing to our database always must be in a transaction
        realm.executeTransaction {

            for(userCount in 0 until 10){
                //The value we send as parameter is the primary key
                val user = realm.createObject<User>(userCount)
                user.name = "testName{$userCount}"
                user.age = 30

                val notes : RealmList<Note> = RealmList()
                for(noteCount in 0 until 10){
                    val note = realm.createObject<Note>()
                    note.id = noteCount
                    note.text = "note${noteCount}"
                    notes.add(note)
                }
                user.notes = notes
            }

        }

    }
And that is it. Easy as that, we created a new database, models, and we fill that with information, pretty simple, isn’t it?.
As I mentioned before, there are several ways to fill our database and create objects. Just as a comment, one of my favorites things is to pass a JSONObject as a parameter (as complex as you wish) If the name of the keys of such JSONObject match with the names of your model, Realm maps the whole object into your database. Awesome, right? Here is the link to the documentation about it.
Now that we have completed the data creation part, what about reading operations? Well, the queries on Realm are very straightforward, let me show a couple of examples:
//This query will return all users
val users = realm.where<User>().findAll()

//This query will return the first user that matches with the "0" id
val user = realm.where<User>().equalTo("id",0L).findFirst()

//This query will return all the users that have a note with the text "note1"
val users = realm.where<User>().equalTo("notes.text", "note1").findAll()
SUMMING IT UP
As you can see, Realm is not difficult. Plus, it has all the power you could ever need. My introduction gives just a taste of what this database can do.
I hope you find this review helpful and look forward to your positive comments or questions. Try Realm, and see if it is as useful for you as it is for me.
Talk with Mobile Application Experts
Discuss your ideas, questions, and concerns. Get answers specific to your needs.

